
|
| ||
|
|
|
|
Actual Drawing Tutorial 1: Creating Simple Web Page |
|
This tutorial helps you to understand the basic techniques, which are used in Actual Drawing. We will create a simple web page (example pictured below) with text and pictures. 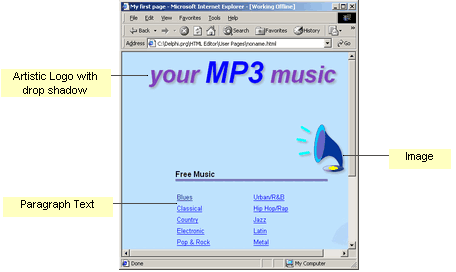 In building this simple web page, you will learn how to set a web page background, add artistic text, add paragraph text, and add a picture. You can see the finished web page in Web browser at MP3Page.html Step 1: Creating a new Page When you start, Actual Drawing opens an empty Page. To start a new Page
Step 2: Setting page properties First of all we need to set the page title - text, which appears in the title bar of the browser's window when a browser displays this page. To set page title
The Page Properties dialog box appears.
Step 3: Page Background For this tutorial web page, we will fill the background with Sky Blue To set page color
The Page Properties dialog box appears.
Step 4: Adding Logo Next step, we will create an artistic logo that our visitors will know what is the name of our site. To add the Logo
Note: We have put the gray background color to avoid a white contour around text when we add a shadow. 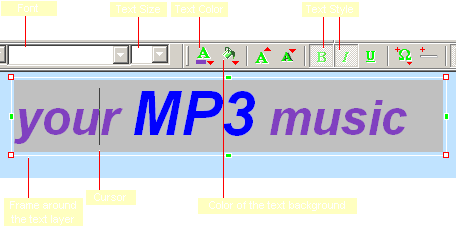
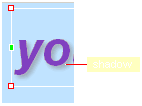
Now, we will add a drop shadow to our logo. I makes the logo more realistic. But before add the shadow, we need to make text transparent. By default, the text is non transparent rectangle. To make text transparent
Step 5: Adding Paragraph text Our web page contains paragraph text with links to music categories. The links are arranged inside a table. We will add a paragraph text layer to our page and insert the table with links to this layer. To add paragraph Text
To insert the table inside the paragraph layer
The New Table dialog box appears.
To insert links to music categories inside the table
The Link Properties dialog box appears.
See Link Properties for more details.
Step 6: Adding a Picture with Shadow  The last thing we need to add to our first page is a picture. We will set this picture as transparent with drop shadow. The last thing we need to add to our first page is a picture. We will set this picture as transparent with drop shadow. To add the picture
To make the picture transparent
To add the drop shadow
|
|
Copyright © 1997-
PY Software. All rights reserved. Other
trademarks are trademarks of their respective owners.
This page was created with Actual Drawing
|
 Click to check the Transparent check box in the Main tab of the Layer Properties panel.